Wednesday, July 15, 2009

Tuning & Maintenance car

A diamond is forever... or so they say.

But unfortunately for everything else, nothing lasts forever.

That is why you need to take good care of your possessions if you want them to last longer. This is especially true for things that have moving parts.

So this is the reason why you need to send in your car for servicing every so often. Once a certain amount of time has passed, or after a particular number of miles have been clocked, it is necessary to have your car serviced and let the car maintenance guys have a look at it.

Some parts get worn out through frequent use, whilst others may already be damaged or are close to being spoilt. Regular car maintenance will ensure your car works when you need it to and you will not suffer any unexpected breakdowns when you least want it to.

All cars require maintenance, but tuned cars even more so.

You see, normal cars are manufactured to last for a fairly long time under normal circumstances. On the contrary, serious race cars like those in the F1 are designed to last just long enough to complete one race.

If you have a highly-tuned car, it will probably fall somewhere in between those two extremes. The more finely-tuned your car is, the more critical it is to perform regular maintenance.

With proper maintenance, you will find that your car parts lasts longer, it performs better, gets better power and traction, plus it is also safer.

You can do most of the maintenance by yourself. It is really simple to do and you will be better off if you learn how to do it yourself instead of sending your car to get it done by someone else. They will charge you an arm and a leg for it, so if you do it yourself, you can use the savings to go invest in some other aftermarket tuning parts.

But of course, you cannot do all of the maintenance yourself. Some sophisticated tuning parts require advance equipment for maintenance, and thus you will have no choice but to send the car to the professionals to have it checked out and serviced.

Just be sure to do it regularly, or else all your time and money spent on the tuning parts will be wasted once everything starts failing and breaking.

Jenis Air filter dan Modified Performance Air Filter serta perbandingan Open Pod Dan Drop In

By kdi • Apr 9th, 2008 • Category: Engine Intake, Tips

Air Filter yang biasa digunakan adalah jenis Drop In dan Open Pod.

Air Filter digunakan secara asasnya untuk menapis angin yang akan masuk ke dalam engine melalui throttle body atau carburator. Namun ramai yang mengabaikan kepentingan air filter. Sebenarnya air filter memainkan peranan yang sangat penting dalam meningkatkan kuasa dan menjimatkan penggunaan bahan api atau petrol pada kenderaan anda.

drop in air filter

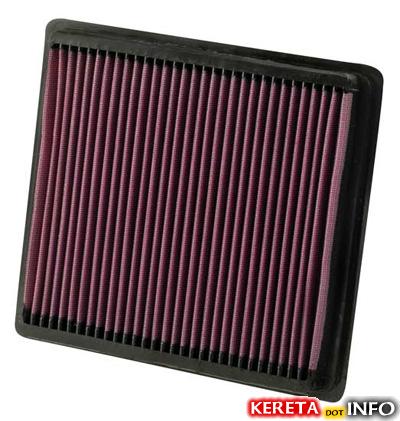
^ Ini adalah jenis air filter “Drop In” yang paling banyak digunakan kerana mudah untuk dipasang dan kosnya murah. Kenderaan standard selalunya menggunakan airfilter drop in.

open pod airfilter with heatshield and piping

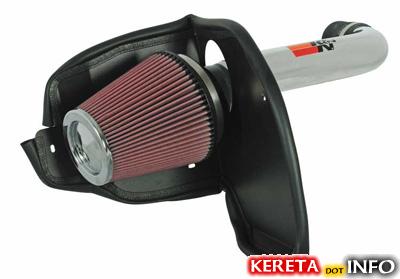
^ Ini pula adalah air filter atau penapis angin kereta jenis “open pod” bersama dengan set heatshield dan piping. Heatshield dan piping perlu dipasang bersama open pod air filter untuk memastikan udara yang panas tidak disedut terus dari enjin dan aliran udara dalam piping lancar. Pemasangannya sudah tentu melibatkan kos yang lebih dan menjanjikan kuasa enjin yang lebih mantap kerana angin terus disedut tanpa halangan yang besar dari luar. Aliran angin yang lebih lancar menyebabkannya lebih membantu enjin lebih respon semasa memandu. Tetapi dari segi penjimatan minyak, kurang dari drop in.

airfilter piping

^ Lokasi pemasangan open pod air filter pada enjin

airfilter standard

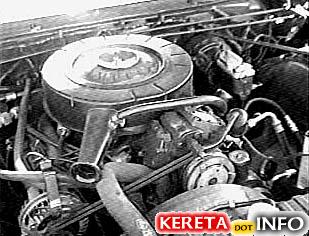
^ Gambar atas menunjukkan airfilter standard yang ada pada enjin kereta. Selalunya berbentuk bulat.

airfilter drop in

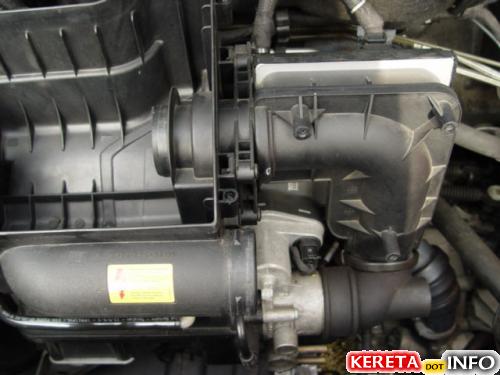
^Ini pula adalah bekas meletak airfilter standard. Selalunya air filter standard menggunakan penapis angin berasaskan kertas. Ia menghalang aliran angin dan menghadkan kuasa kereta anda.

Secara ringkasnya,

Drop In Air Filter:

Kebaikan : Kurang bunyi, Penampilan biasa, Lebih jimat minyak
Keburukan : Masih menghalang pergerakan angin, Kuasa yang biasa atau peningkatan sedikit untuk drop in performance air filter

Open-pod Air filter:

Kebaikan : Sedutan angin yang lebih baik, Lebih kuasa dan RPM lebih mudah naik
Keburukan : Menghasilkan bunyi bising, Kemungkinan menyedut udara panas terus dari enjin jika tanpa heatshield dan Cold air intake, Mudah kotor sebab terbuka, Kurang jimat minyak sebab kaki yang gatal asyik nak tekan pedal sampai RPM tinggi. =p


PERODUA.

PERODUA.

Perusahaan Otomobil Kedua Sdn Bhd (PERODUA), established in 1993, is a joint venture company between Malaysian and Japanese partners. The shareholders of Perodua are UMW Corporation Sdn Bhd with 38% stake, Daihatsu Motor Co. Ltd. (20%), MBM Resources Bhd (20%), PNB Equity Resources Corporation Sdn Bhd (10%), Mitsui & Co. Ltd (7%) and Daihatsu (Malaysia) Sdn Bhd (5%).

Perodua Auto Corporation Sdn Bhd (PCSB) was established in the final quarter of 2001. Besides Perodua, the two other joint venture partners of PCSB are Daihatsu Motor Co. Ltd. and Mitsui & Co. Ltd both of Japan. The manufacturing operations of the Perodua Group are being managed by PCSB.

Perodua headquarters is located on an 81-hectare site in Sungai Choh, Rawang, Selangor Darul Ehsan. It houses among others Perodua corporate building, R&D testing laboratories and styling studio, vehicle test track, manufacturing plant, engine plant, pre-delivery inspection area, vehicle distribution stockyard and parts warehouse.

Perodua Kelisa is one of Malaysian’s favourite mini compact car due to its simple & nice appearance and the performance of 1000cc (989cc) car is just impressive. But unfortunately Perodua has stopped its production just after Perodua Viva came out to Malaysia automotive market as Kelisa replacement model. Driving Perodua Kelisa is quite fun because it has a really good pickup compare to other car. The power to weight ratio is enough and you surely don’t need a turbo charger for this twin cam DOHC 1000 (989) cc engine for Kelisa. Today I just want to share some pretty picture of modified Kelisa or custom bodykit Kelisa, it’s history and full specification of Kelisa.


MODIFIED & CUSTOM BODYKIT

DIY : Change standard Perodua Kelisa front bodypart to Daihatsu Mira L700

Posted by: Hedayat In: Cars

Yes, this weekend activities of a bankcruptcy of me. Hehehe .. since I have planned next month budjet and confirm to take this bodypart to do painting job next weekend, so i put back the Mira L7 TR bodypart back .. Alhamdulillah.

Alright, to those who doesn’t know what is a bodypart, Perodua Kelisa have a sibling leave in Japan, it called Daihatsu Mira L700 Cuore or Mira Gino. Since that bodypart have been imported to Malaysia and all JDM modders out there will definitely convert it to this model.

deanz Mira Gino D-sport with carbon fiber bonnet and rare dsport grill. powered by K3-VET.

Mira L700 Family have also several models from the cheap Injection (oppss .. sorry those injection lover, but the coolness and rareness of Injection Chrome grill is still the best !!) to the full accessory Mira Gino Minilite. and I have already used L701 Senyum model since 2006. Now, upgrade the front bodypart to Mira L7 TR turbo.

last time L7 Senyum. sold this bodypart already.

Back to the topic, now I will show you the DIY of changing the bodypart. The requirements are … jeng jeng jeng .. A toolbox, a 10″ spanner , T size 10″ (all the nuts size are 10″), screwdriver, power of a man ( u may need some other friends if you are a gay. kekeke. but 2 people is prefered), etc

the equipments.

the thing

OK, next , open your hood, you will find 4 nuts at the hinge( in BM : ENGSEL ).. 2 at right and other 2 at left. If u are a nut, then no need to read more about this post, just skip and read other, this post is not for you. ( if u are a male and don’t understand what I’m talking about, you are a gay) .. OK, just loosen all the nuts by your equipment, i don’t care what tools u are using ,as long as u can loose the nuts, then it’s fine. (hint : do not just open the nuts one by one, loose all 4 nuts together). Where’s the picture? ok i will add later.

After you take off your hood, now you must open the bumper. you can see 4 nuts in front of the main frame. the other nuts are hidden inside the plate number, open your plate number first (if you dont know how to open your plate number, ask your father, maybe he knew.) there are also 2 other nuts inside the front signal hole. open your signal first then you will find the nuts. the other 2 last nuts at bumper is under the front tyre.(picture attached at the fender part belowww). how can i describe this? urghhhh !! find yourself la !!

Fine, now open the headlamps. there are 3 nuts , and some sockets. open the 3 nuts like the picture below, then open the sockets attach to the bulb. Arghhh dont asked me how to open the socket. even children below 3 years old also can open it, noob.

I will show you a picture of opening the front hood.

(i open the hood after i take out the headlamps and bumper.. why? noticed that it was a very bright and shiny day, i decided to take out the hood later.. weyy panas oOoo tadi .. hadoi makin hitam la aku yg dah gelap nii )

Now open the fenders. there are 2 nuts at the top frame, 1 near the headlamp, 2 at the door ( 1 under the side mirror inside the door , other 1 at below the body frame, sorry no picture of this 2 nuts)

1 nuts below the headlamp. 1 of the other circle at the fender is where the bumper nuts located under the tyre. you must sengetkan the tyre to loosen the nuts, it makes life easier .. wakakaka.. and then, walla, you have a “togel” kelisa without bodypart.

yes, how about the Mira L700 bodypart? how to put it? It’s easy just like you take out your standard bodypart. Plug and Play, no modification needed. All nuts and screw are at the same location. So, i wont put picture about this, hari dah gelap wehh ,, nak hujan plak, kena pasang set cepat2 !! the arrangement to put back the bodypart are 1. fenders, 2. headlamps, 3. bumper, 4. hood.

walla, the last thing to put , TR hood.

hah .. finished. can’t wait to go to paint shop.

Next time : How to open **** bumper to replace with the bumper below.